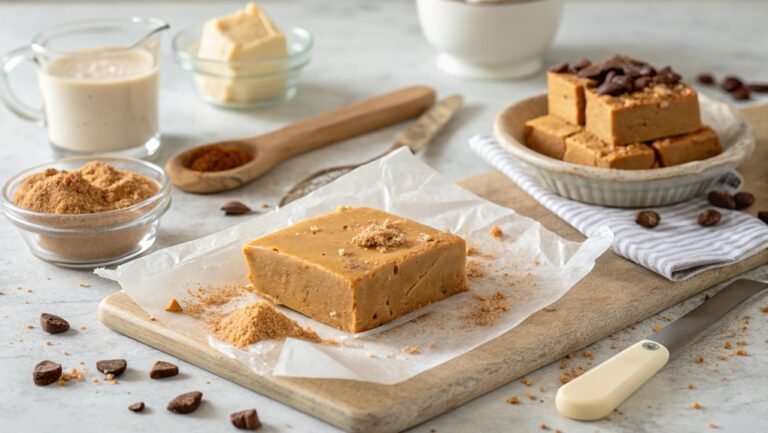
Peanut Butter and Jelly Bars Recipe
Originating from World War II as a popular soldier ration, the classic peanut butter and jelly combination evokes nostalgia. These Peanut Butter and Jelly Bars offer a unique twist on this childhood favorite.
To create a satisfying treat that suits any occasion, mastering key steps is essential. Achieving the perfect balance of flavors and textures is crucial for success.
Recipe
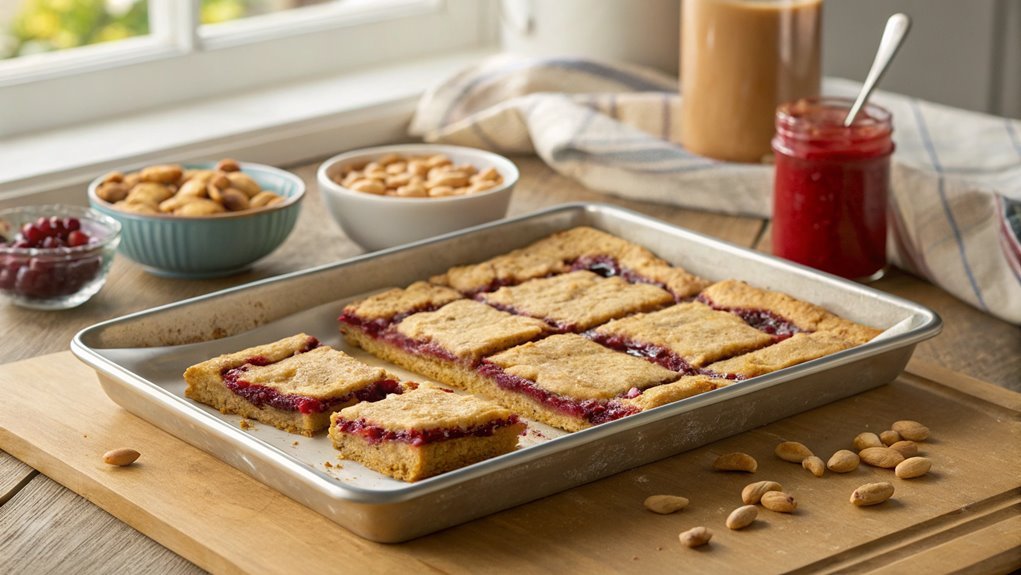
Peanut Butter and Jelly Bars are a delightful twist on the classic sandwich that many of us grew up loving. These bars combine the rich, creamy texture of peanut butter with the sweet, fruity goodness of jelly, all nestled in a soft, chewy base that’s perfect for snacking.
They’re incredibly easy to make and are sure to please both kids and adults alike. Ideal for lunchboxes, potlucks, or just as a sweet treat at home, these bars strike the perfect balance of flavor and nostalgia.
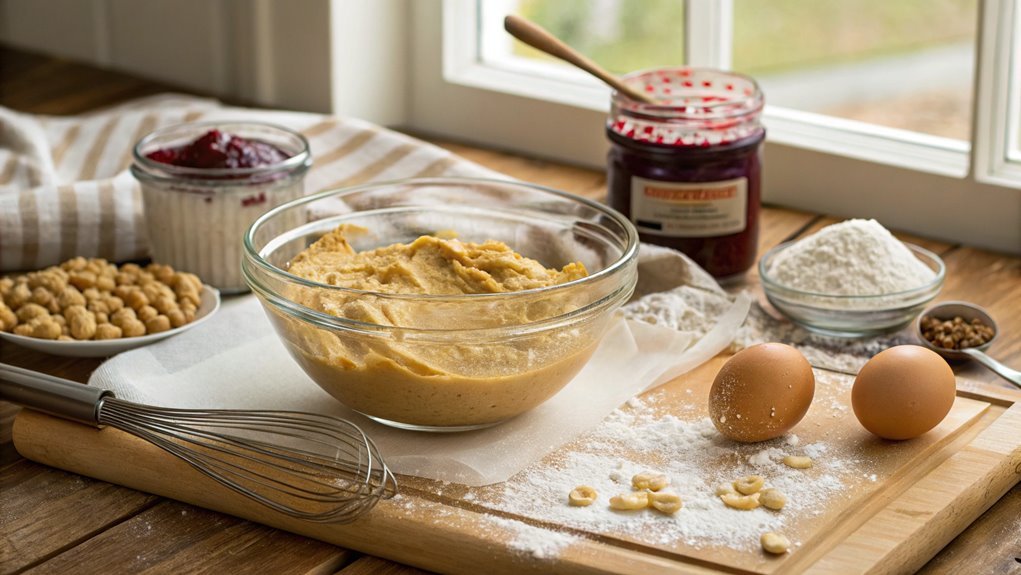
To start, you’ll want to gather your ingredients and preheat your oven. The preparation involves mixing the peanut butter and sugar to create a deliciously sweet base, then layering it with your choice of jelly or jam.
Once baked, these bars can be cooled, cut into squares, and enjoyed at any time of day. Whether you stick to the classic grape jelly or experiment with other flavors like raspberry or strawberry, you’ll have a delightful dessert that’s both satisfying and simple.
Ingredients:
- 1 cup creamy peanut butter
- 1 cup granulated sugar
- 1 cup brown sugar, packed
- 2 large eggs
- 1 teaspoon vanilla extract
- 2 cups all-purpose flour
- 1 teaspoon baking powder
- ½ teaspoon salt
- 1 cup jelly or jam (your choice)
- Optional: ½ cup chopped peanuts or chocolate chips for added texture
Now let’s move on to the cooking steps.
Cooking Steps
Get ready to whip up some delicious Peanut Butter and Jelly Bars!
First, you’ll preheat your oven to 350°F, which sets the stage for baking perfection.
Then, you’ll mix together creamy peanut butter and sugar, add in eggs and vanilla, and fold in the flour—this is where the magic starts to happen!
Step 1. Preheat the Oven to 350°F
To kick off your delicious Peanut Butter and Jelly Bars, preheat your oven to 350°F. This step is essential, as it guarantees your bars bake evenly and achieve that perfect golden-brown top. The warmth of the oven will create a cozy environment for the delightful flavors to meld together.
While your oven is heating up, take a moment to gather all your ingredients. Having everything ready will make the entire process smoother and more enjoyable. You don’t want to rush through the recipe and miss out on any of the deliciousness, right?
Once your oven reaches that ideal temperature, you’re one step closer to creating a treat that’s sure to impress family and friends. As the heat builds, imagine the sweet and nutty aroma filling your kitchen while those bars bake. It’s hard to resist, isn’t it?
Preheating might seem like a small task, but it sets the stage for baking success. So, enjoy this moment of anticipation. You’re about to begin a tasty adventure, and your Peanut Butter and Jelly Bars will be well worth the wait! Get ready to mix and bake your way to a delightful treat!
Step 2. Mix Peanut Butter and Sugar
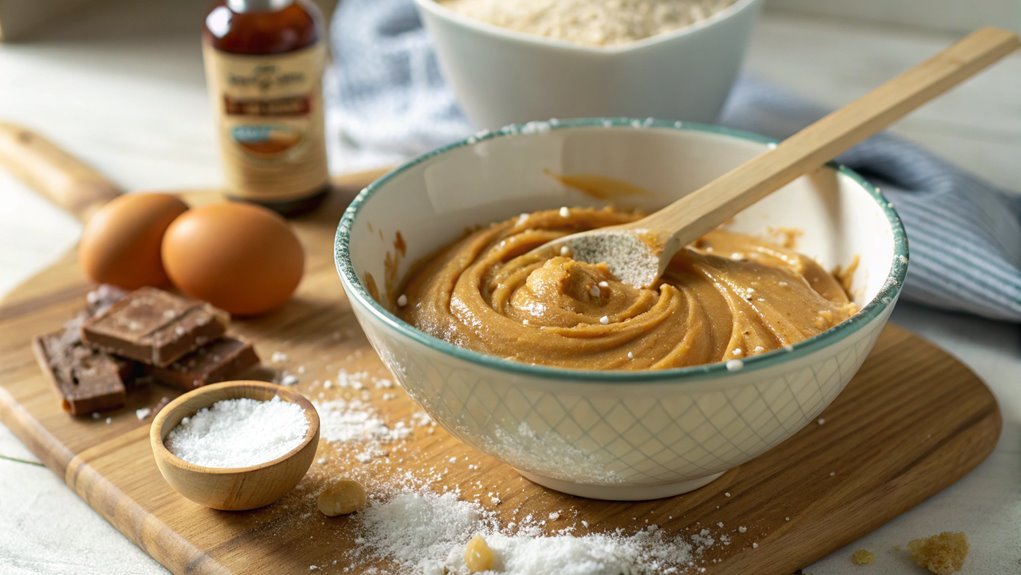
Start by combining the creamy peanut butter and granulated sugar in a mixing bowl. You’ll want to use a sturdy spatula or a hand mixer to blend them together until the mixture is smooth and well combined. The rich aroma of peanut butter will fill your kitchen, making your mouth water in anticipation!
As you mix, pay attention to the texture—aim for a thick, creamy consistency that’s easy to spread. This step is essential because the peanut butter and sugar create a sweet base that’ll enhance the flavor of your bars. You might find yourself sneaking a taste; don’t worry, it’s completely normal!
Once you’ve got that perfect blend, take a moment to appreciate your handiwork. The combination of creamy peanut butter and sweet sugar is the heart of these bars, promising a delicious treat.
Step 3. Add Eggs and Vanilla
Once you’ve achieved that creamy peanut butter and sugar mixture, it’s time to elevate the flavor by adding the eggs and vanilla. This step is essential, as it not only enriches your bars but also adds moisture and a delightful aroma.
You’ll want to crack in the eggs one at a time, allowing each to blend seamlessly into your mix. Then, don’t forget to pour in that splash of vanilla extract—it’s the secret ingredient that brings everything together!
Here’s what you’ll need to do:
- Add two large eggs: This gives your bars structure and helps them rise beautifully.
- Include one teaspoon of vanilla extract: The sweet aroma will make your kitchen smell heavenly.
- Mix until well combined: You want a smooth, homogenous mixture with no streaks.
- Scrape down the sides: Make sure all that peanut buttery goodness gets incorporated evenly.
Feel the excitement build as you watch your mixture transform! This is one step closer to creating a dessert that’s sure to impress.
Keep that enthusiasm going; the best is yet to come!
Step 4. Fold in the Flour
Now it’s time to fold in the flour, which helps give your peanut butter and jelly bars their delightful texture. Grab your mixing bowl and a spatula, and let’s get to work!
Start by sifting the flour into the mixture to avoid any lumps. This step is essential; it guarantees your bars come out light and fluffy.
As you fold, gently incorporate the flour into the wet ingredients. Use a smooth motion, scraping the sides of the bowl as you go. You want to mix just until you see no more dry flour; overmixing can lead to dense bars. It’s all about finding that perfect balance!
The batter will start to come together beautifully, and you’ll notice the rich peanut butter aroma filling your kitchen. This is the magic of baking!
Make sure you scrape down the sides to guarantee even mixing. Once everything is combined, you’ll have a thick, luscious batter ready for the next step.
Just imagine how delicious these bars will be once they’re baked! So, take your time with this step, and enjoy the process. Your taste buds will thank you later!
Step 5. Spread Jelly on Top
Typically, you’ll want to spread the jelly evenly over the batter to guarantee every bite is packed with flavor. This step is where your bars transform into a delightful treat that combines the rich taste of peanut butter with the fruity sweetness of jelly.
So, grab your favorite jelly and get ready to elevate your bars!
Here’s how to do it:
- Choose your jelly: Whether it’s classic grape, strawberry, or raspberry, pick a flavor that excites your taste buds.
- Scoop the jelly: Use a spoon to scoop out generous dollops of jelly onto the batter.
- Spread it out: With a spatula or the back of the spoon, carefully spread the jelly across the surface. Aim for an even layer, reaching all corners.
- Don’t overdo it: You want enough jelly for flavor, but not so much that it makes the bars soggy.
Once you’ve spread the jelly, you’ll see the vibrant color contrast against the golden batter.
It’s a beautiful sight! Now, you’re ready to bake these delicious peanut butter and jelly bars into a warm, gooey masterpiece. Enjoy the process and the tasty results!
Final Thoughts
As you savor the last bite of your homemade peanut butter and jelly bars, it’s clear that this delightful treat isn’t just about the flavors but also the joy of baking.
The process of mixing, spreading, and baking brings a sense of accomplishment that’s hard to beat. Each layer of peanut butter and jelly, combined with the chewy base, creates a nostalgic experience that’ll remind you of childhood lunches and cozy afternoons.
You’ve taken simple ingredients and transformed them into a delicious dessert that’s perfect for sharing.
Whether it’s a family gathering, a bake sale, or just a sweet treat for yourself, these bars are sure to impress.
The best part? They’re super easy to make! You can customize them with different flavors of jelly or even add chocolate chips for an extra twist.
Frequently Asked Questions
Can I Use Natural Peanut Butter for This Recipe?
Yes, you can use natural peanut butter for this recipe. Just keep in mind that natural peanut butter may be more oily, so you might need to adjust other ingredients for the right consistency. Enjoy!
How Should I Store Leftover Bars?
Storing leftover bars is like tucking treasures away for later enjoyment. You should wrap them tightly in plastic wrap or place them in an airtight container, then keep them in the fridge for up to a week.
Can I Substitute Jelly Flavors?
Absolutely, you can substitute jelly flavors! Experiment with your favorites, like raspberry or strawberry, to create unique twists. Just make certain the consistency remains similar for the best results in your delicious treat. Enjoy the creativity!
Are These Bars Suitable for Freezing?
Absolutely, you can freeze these bars! They’ll stay deliciously fresh, like a treasure waiting to be discovered later. Just wrap them tightly in plastic wrap and store them in an airtight container for best results.
What Is the Best Way to Cut the Bars?
To cut the bars neatly, use a sharp knife and warm water. Dip the knife in hot water, wipe it dry, and slice through the bars. This’ll help you achieve clean, even pieces without sticking.
Conclusion
You’ve learned how to make delicious peanut butter and jelly bars, so share the joy with others! Americans consume 1.5 million pounds of peanut butter annually, showcasing its popularity. Gather your ingredients, follow the steps, and enjoy these mouthwatering bars with loved ones. They’re sure to bring smiles and sweet memories!