Nutella Hazelnut Tart Recipe
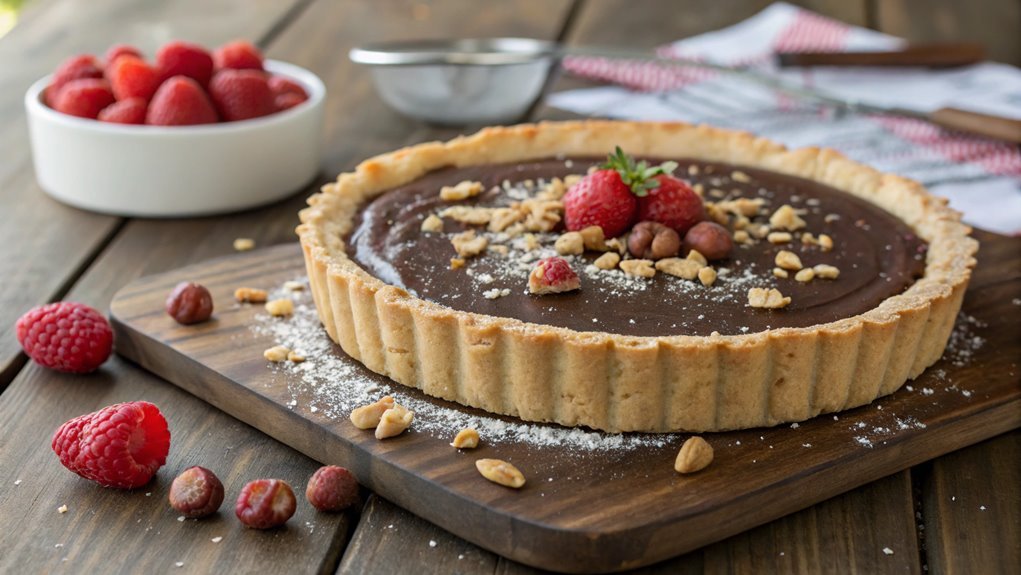
For a dessert that merges simplicity with indulgence, the Nutella Hazelnut Tart stands out with its buttery, cocoa-infused crust complementing a rich Nutella filling. Enhance its presentation with toppings like fresh berries or whipped cream.
Before starting, focus on essential steps for perfect flavor and texture balance. Master key techniques to make this tart unforgettable.
Recipe
Indulging in a Nutella Hazelnut Tart is the perfect way to satisfy your sweet tooth while enjoying a rich and decadent dessert. This delightful tart combines the creamy, chocolate-hazelnut flavor of Nutella with a buttery, flaky crust that melts in your mouth.
Whether it’s for a special occasion or just a cozy night in, this tart is sure to impress friends and family alike with its luscious taste and elegant appearance.
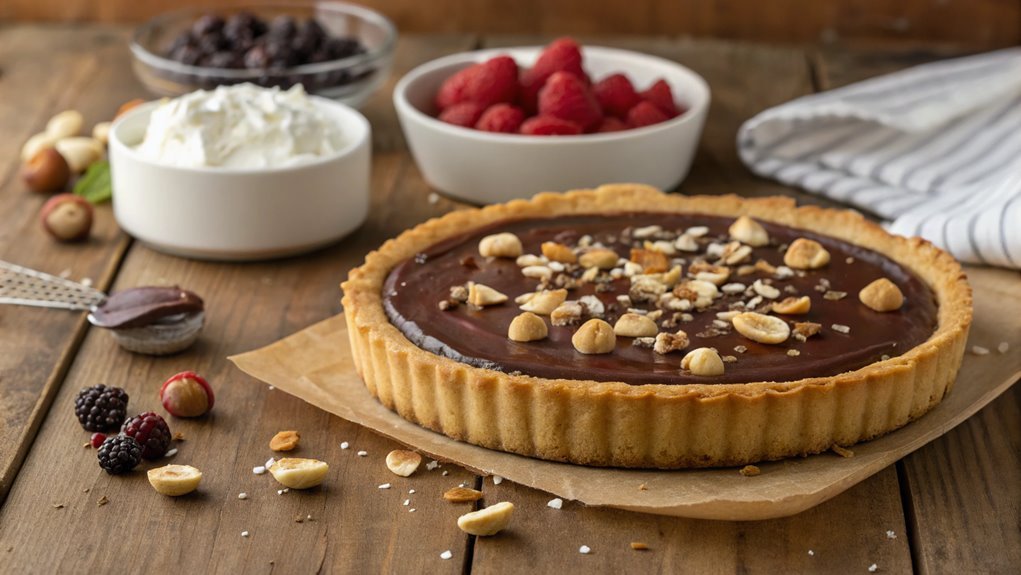
Making this tart isn’t as complicated as it may seem. With a few simple ingredients and steps, you’ll have a stunning dessert that looks as good as it tastes. The tart can be served warm or cold, and you can even add toppings like whipped cream, fresh berries, or a sprinkle of chopped hazelnuts for an extra touch.
So, roll up your sleeves and get ready to create a dessert that will become a favorite in your household.
Ingredients:
- 1 pre-made tart crust (9-inch)
- 1 cup Nutella
- 1 cup heavy cream
- 3 large eggs
- 1/2 cup granulated sugar
- 1 teaspoon vanilla extract
- 1/4 cup chopped hazelnuts (optional for topping)
- Sea salt (optional for garnish)
Now let’s move on to the cooking steps.
Cooking Steps
Now that you’ve gathered your ingredients, let’s get cooking!
First, you’ll want to preheat your oven to a cozy 350°F, setting the stage for a delicious tart.
Once that’s done, we’ll layer in those crunchy hazelnuts and spread the creamy Nutella filling to create a mouthwatering treat that you won’t be able to resist!
Step 1. Preheat Oven to 350°F
Preheating your oven to 350°F is an essential step in making the perfect Nutella hazelnut tart. This temperature is ideal for creating that golden, flaky crust and guaranteeing your filling is cooked to creamy perfection. So, let’s get started!
First, make sure to clear some space in your kitchen, and grab your oven mitts. Turn on your oven and set it to 350°F. If your oven has a preheat indicator, keep an eye on it.
It’ll let you know when it’s ready to go. While the oven warms up, you can take a moment to gather your ingredients and prepare your tart pan. This is a great time to get excited about the deliciousness that’s about to happen!
Once the oven reaches the desired temperature, it’ll be time to pop your tart in. Preheating guarantees that your tart bakes evenly and achieves that delicious texture you crave.
Plus, the aroma of warm Nutella and toasted hazelnuts will soon fill your kitchen, making the wait even more thrilling. Enjoy the process, and get ready for a delightful treat that’s sure to impress!
Step 2. Add Hazelnuts to Crust
Once your oven is preheated, it’s time to enhance your tart crust with the rich flavor of hazelnuts. Start by gathering your ingredients: finely chopped hazelnuts, flour, butter, sugar, and a pinch of salt. The combination of these ingredients will create a delightful nutty base for your tart.
In a mixing bowl, combine the flour, sugar, and salt. Then, add the finely chopped hazelnuts, and mix them together until evenly distributed. The smell of the hazelnuts will already start to ignite your senses, and trust me, it’s just a preview of what’s to come!
Next, cut in the cold butter until the mixture resembles coarse crumbs. You can use a pastry cutter or your fingers for this step.
Once you’ve achieved that crumbly texture, it’s time to bring it all together. Add a splash of cold water, mixing until the dough holds together.
Press the dough into your tart pan, ensuring it’s even along the edges. Don’t worry if it seems a bit crumbly; just work with it gently.
Once that’s done, pop it in the oven, and let the magic happen! Your kitchen will soon be filled with an irresistible aroma. Enjoy the process!
Step 3. Spread Nutella Filling Evenly
As you prepare to spread the Nutella filling, make sure your tart crust has cooled completely to prevent a gooey mess.
Now, you’re ready to plunge into the deliciousness! Grab a generous scoop of Nutella and place it in the center of your cooled tart crust. Using a spatula or the back of a spoon, start spreading the Nutella outward from the center. Move in gentle, circular motions to encourage even distribution.
Take your time and enjoy the process! You want to guarantee every inch of the crust is covered, so don’t rush. If you encounter any stubborn areas, simply add a little more Nutella and keep spreading.
The rich, creamy texture of the Nutella should glide smoothly over the crust, filling in all the nooks and crannies. If you like, you can even create a slight swirl pattern for a beautiful finish.
Once you’ve spread the Nutella evenly, step back and admire your work. It’s the perfect base for the next steps in creating your Nutella hazelnut tart.
Get excited; you’re one step closer to indulging in this decadent treat!
Step 4. Bake for 25 Minutes
Now it’s time to bake your tart for 25 minutes. Preheat your oven to 350°F (175°C) if you haven’t already done so. This step is essential, as it guarantees even baking and that your tart achieves that perfect golden-brown crust.
Once your oven is ready, place your tart on the center rack and close the door, letting the magic happen.
Here are a few tips to keep in mind during the baking process:
- Watch for bubbles: Make sure the Nutella filling doesn’t bubble over; this means it’s cooking just right!
- Use a timer: Set a timer for 25 minutes to avoid overbaking—nobody wants a dry tart!
- Check for doneness: Near the end of baking, peek through the oven window. The edges should be firm, and the center will still have a slight jiggle.
- Let it breathe: Once the timer goes off, resist the urge to dig in immediately; letting it sit for a moment helps set the filling.
Enjoy the delightful aroma wafting through your kitchen as you await the delicious tart! Happy baking!
Step 5. Cool Before Serving
After your tart has baked to perfection, it’s vital to let it cool before serving. This step is significant because it allows the flavors to meld beautifully and guarantees that the tart maintains its structure when you slice into it. You don’t want to rush this part, as serving a warm tart can lead to a gooey mess that doesn’t do justice to your hard work.
Start by removing the tart from the oven and placing it on a wire rack. Let it cool in the tart pan for about 15-20 minutes. This cooling period helps the filling set, making it easier to cut clean slices.
After that, carefully remove the tart from the pan and let it cool completely on the rack. It’s tempting to jump in right away, but giving it at least an hour will make a world of difference.
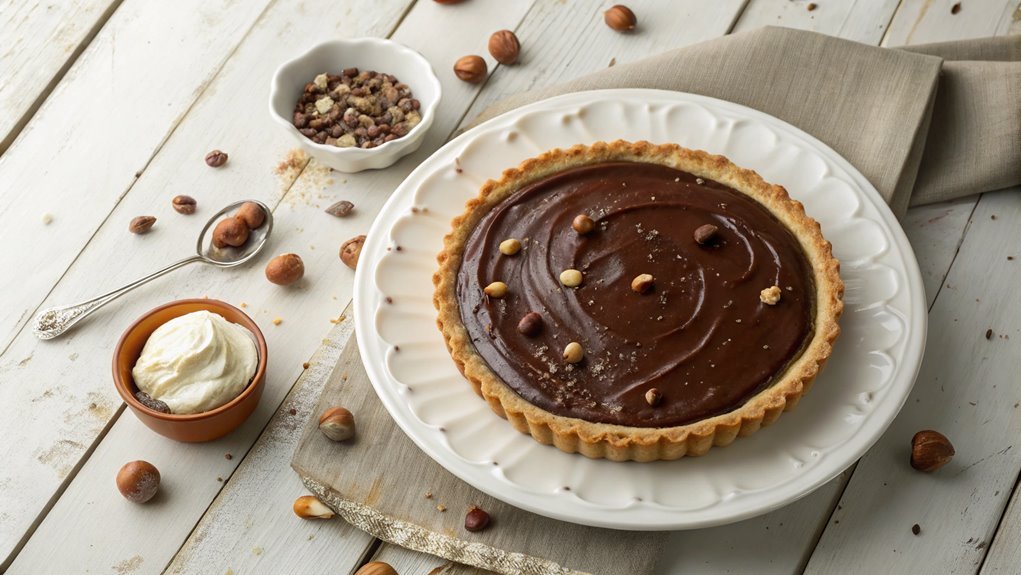
Once cooled, you can dust the top with powdered sugar or add some chopped hazelnuts for that extra flair. Now you’re ready to slice and serve! Enjoy the delightful combination of Nutella and hazelnuts with each bite—your guests will be begging for seconds!
Final Thoughts
While you may be tempted to rush through the baking process, taking your time with this Nutella hazelnut tart will truly pay off in flavor and presentation.
This dessert isn’t just about taste; it’s a feast for the eyes too! Imagine serving a beautifully crafted tart that combines rich chocolate and nutty goodness. You’ll find that the effort you put in creates a delightful experience for everyone.
Here are a few tips to guarantee your tart shines:
- Use fresh ingredients: Quality makes a difference! Fresh hazelnuts and high-quality Nutella elevate your tart.
- Chill your dough: Allow the tart shell to chill; it helps create a flaky, perfect crust.
- Layer flavors: Consider adding a pinch of sea salt or a splash of vanilla for an extra flavor boost.
- Serve with style: A dollop of whipped cream or a sprinkle of chopped hazelnuts adds that final touch.
Frequently Asked Questions
Can I Use Almond Flour Instead of Regular Flour?
Yes, you can use almond flour instead of regular flour. Just remember, almond flour has a different texture and moisture content, so you might need to adjust other ingredients for the best results. Enjoy experimenting!
How Long Will the Tart Stay Fresh?
Like a fleeting sunset, the tart’s freshness lasts about 3 to 5 days in the fridge. Store it properly to preserve its essence, and savor each bite before it fades into memory.
Can I Freeze the Nutella Tart?
Yes, you can freeze the tart! Just wrap it tightly in plastic wrap or foil to prevent freezer burn. When you’re ready to enjoy it, thaw it in the refrigerator for the best texture.
What Other Toppings Can I Use?
You can elevate your dessert experience with fresh berries, crushed nuts, or whipped cream. You can sprinkle sea salt, drizzle caramel, or add chocolate shavings. Each topping brings a unique flavor that’ll delight your taste buds!
Is This Recipe Suitable for Gluten-Free Diets?
Yes, you can adapt this recipe for gluten-free diets. Just swap regular flour for a gluten-free alternative, like almond or coconut flour. Always check labels to verify all ingredients meet your dietary needs. Enjoy!
Conclusion
You’ve just crafted a Nutella Hazelnut Tart that’s bound to impress! Gather your friends and family to savor this delightful treat. Served warm or chilled, each bite is rich and satisfying. Add your favorite toppings for extra flair and enjoy this delicious dessert adventure. Happy cooking!