Apple Fritter Recipe
Remember that first bite of an apple fritter on a crisp autumn day? You can easily recreate its warm, spiced flavor by mixing fresh apples with a simple batter and some key spices.
To elevate this classic treat, consider trying some unique ingredients or methods. Let’s explore how to make your fritters truly stand out.
Recipe
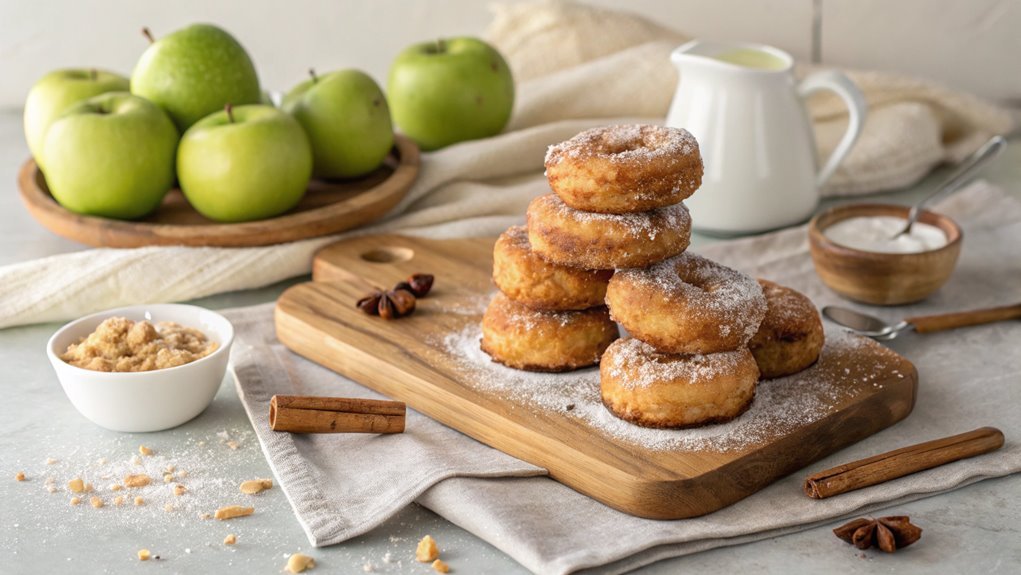
Apple fritters are a delightful treat that combines the sweetness of apples with a crispy, golden-brown exterior. These deep-fried pastries are perfect for breakfast or as a snack, and they can be enjoyed warm with a dusting of powdered sugar or drizzled with a glaze.
The recipe is simple and requires just a few ingredients, making it an ideal choice for both novice and experienced bakers alike.
To make the perfect apple fritters, you’ll want to start by selecting the right type of apples. Granny Smith apples are a popular choice due to their tartness, which balances the sweetness of the batter.
The fritters can be customized by adding cinnamon or nutmeg for extra warmth. Once you have your ingredients ready, the process of mixing, frying, and glazing will result in a batch of delicious apple fritters that are sure to impress your family and friends.
Ingredients:
- 2 medium apples, peeled and diced
- 1 cup all-purpose flour
- 1/2 cup sugar
- 1 teaspoon baking powder
- 1/2 teaspoon cinnamon
- 1/4 teaspoon nutmeg
- 1/4 teaspoon salt
- 1 large egg
- 1/2 cup milk
- 1 teaspoon vanilla extract
- Oil for frying
- Powdered sugar for dusting (optional)
Now let’s move on to the cooking steps.
Cooking Steps
Now that you’ve gathered all your ingredients, it’s time to get cooking!
Start by preparing the apple mixture, as this will be the star of your fritters.
Once you’ve mixed the dry ingredients thoroughly, you’ll be ready to fold in those delicious apples and fry them to golden perfection.
Step 1. Prepare the Apple Mixture
As you prepare the apple mixture, start by peeling and coring about four medium-sized apples. Choose crisp, juicy varieties like Granny Smith or Honeycrisp for the best flavor.
Once they’re peeled and cored, chop the apples into small, bite-sized chunks. This will help them cook evenly and blend beautifully into your fritters.
Next, toss the apple pieces in a bowl with a sprinkle of cinnamon and a touch of sugar. This step really enhances the natural sweetness and adds a lovely warmth to your mixture.
Stir it gently to coat all the pieces evenly. You can also add a splash of lemon juice to brighten the flavors and prevent the apples from browning.
Now, let the mixture sit for about 10 minutes. This allows the apples to release some juices, which will help create a deliciously moist fritter.
As you wait, you can start to get excited about how amazing your kitchen will smell once you begin frying! Your apple mixture is now ready, and you’re one step closer to creating those irresistible apple fritters.
Enjoy the process; cooking is all about fun and creativity!
Step 2. Mix Dry Ingredients Thoroughly

Start by gathering your dry ingredients to create the perfect batter for your apple fritters. This step is essential, as it sets the foundation for your delightful treats. You want everything to blend seamlessly, ensuring every bite is flavorful and light. Here’s what you’ll need:
- All-purpose flour
- Baking powder
- Sugar
Once you have your ingredients ready, measure them out carefully. In a large mixing bowl, combine the flour, baking powder, and sugar.
Make sure to use a whisk to mix these ingredients thoroughly. This process helps to aerate the flour, ensuring your fritters will be fluffy and delicious.
Don’t rush this step! Mixing well will prevent clumps and guarantee an even distribution of flavors.
After you’ve whisked the dry ingredients together, take a moment to admire your work. It’s amazing how a few simple components can come together to create something so wonderful!
Once everything’s well combined, you’ll be ready to move on to the next step, where you’ll fold in the apples. Get excited—it’s almost time to create the scrumptious apple fritters you’ve been dreaming of!
Step 3. Fold in the Apples
Once your dry ingredients are fully combined, it’s time to fold in the apples, bringing a burst of flavor and texture to your batter.
Start by taking your diced apples and gently add them to the mixture. You want to make sure the apples are evenly distributed, so they’ll create delightful pockets of sweetness in every bite.
Using a spatula, carefully lift and turn the batter over the apples, ensuring you don’t overmix. This preserves the tender chunks of fruit and maintains the fluffiness of your batter.
The key here is to blend just enough to incorporate the apples without breaking them down. As you fold, you’ll notice the vibrant colors of the apples peeking through the batter, making it even more inviting.
Just imagine the aroma of warm, cinnamon-spiced apple fritters wafting through your kitchen!
Once you feel confident that the apples are well combined, you’re ready to move on to the next step in creating your delicious fritters.
This is where the fun really begins, and you’ll be one step closer to enjoying a warm, homemade treat that’s sure to impress your friends and family!
Step 4. Heat Oil for Frying
To fry your apple fritters to perfection, heat about 2 inches of oil in a deep skillet or heavy pot over medium-high heat. Getting the oil temperature just right is essential, as it guarantees your fritters become golden brown and delicious without absorbing too much grease.
You want to create that ideal crispy outer layer that everyone loves!
Here’s how to check if the oil is ready:
- Use a thermometer: Ideally, the oil should reach 350°F (175°C). This temperature will help the fritters cook evenly.
- Test with a small piece of batter: Drop a small amount of your fritter batter into the oil. If it sizzles and rises to the surface, you’re good to go!
- Watch for smoke: If the oil starts smoking, it’s too hot! Turn down the heat and wait a moment for it to cool down.
Once your oil is ready, carefully drop in the fritters, taking care not to overcrowd the pot.
This is your chance to create a delicious, crispy treat that’ll impress everyone you share them with. Enjoy the process and the delightful aroma that fills your kitchen!
Step 5. Drain Excess Oil

After frying your apple fritters to a perfect golden brown, it’s important to drain any excess oil to keep them light and crispy.
Start by placing a cooling rack over a baking sheet. This setup allows the oil to drip away while keeping the fritters elevated. Carefully transfer your freshly fried fritters onto the rack, ensuring you don’t overcrowd them.
If you don’t have a cooling rack, you can use paper towels on a plate, but a rack works best to avoid sogginess.
Let the fritters rest for a few minutes. This short time not only helps them cool down but also gives any remaining oil a chance to escape.
As you watch them, you’ll notice how they maintain their delightful texture. If you find the fritters still look oily, you can lightly dab the tops with a paper towel.
Once they’re drained, you can dust them with powdered sugar or dip them in a sweet glaze, if you like.
Enjoying these warm, crispy apple fritters is a treat that’ll impress your family and friends. So, get ready to savor each delicious bite!
Final Thoughts
As you savor your homemade apple fritters, it’s clear that the effort you put into making them was well worth it. Each bite bursts with sweet, spiced apple goodness, and the golden, crispy exterior adds a delightful crunch.
You’ve created a treat that’s not only satisfying but also fills your kitchen with an irresistible aroma.
Now that you’ve mastered this recipe, consider these three tips to elevate your fritter-making experience:
- Experiment with spices: Don’t hesitate to add a pinch of nutmeg or allspice for an extra flavor kick.
- Try different fruits: Apples are classic, but pears or even peaches can bring exciting new twists to your fritters.
- Serve with dipping sauces: A drizzle of caramel or a side of vanilla icing can take your fritters to the next level.
Frequently Asked Questions
Can I Use Other Fruits Instead of Apples?
Yes, you can definitely use other fruits instead of apples. Consider pears, peaches, or berries; each brings its unique flavor. Just adjust the sugar and spices to complement your chosen fruit for the best results.
How Do I Store Leftover Apple Fritters?
To store leftover fritters, let them cool completely, then place them in an airtight container. You can keep them in the fridge for up to three days or freeze for longer-lasting freshness. Enjoy later!
Can I Make Apple Fritters Gluten-Free?
You can enjoy delicious treats without gluten. While traditional recipes use wheat flour, you can substitute it with gluten-free flour blends, ensuring everyone can savor the delightful, sweet crunch of your homemade fritters.
What Type of Apples Are Best for Fritters?
For the best fritters, you’ll want to use apples that hold their shape and offer a balance of sweetness and tartness. Honeycrisps and Granny Smiths work great, giving your fritters fantastic flavor and texture.
Can I Freeze Apple Fritters for Later?
Yes, you can freeze apple fritters for later! Just let them cool completely, wrap them tightly in plastic wrap or foil, and store them in an airtight container. They’ll stay fresh for up to three months.
Conclusion
You’re just steps away from enjoying warm, crispy apple fritters that are sure to impress! Imagine biting into a delicious blend of tender apples and sweet, spiced batter—it’s like a cozy hug for your taste buds.
Gather your ingredients and dive into this delightful cooking adventure. Whether you stick with apples or try other fruits, each fritter promises to be a treat you won’t want to miss. Happy frying!