Yule Log Cake Recipe
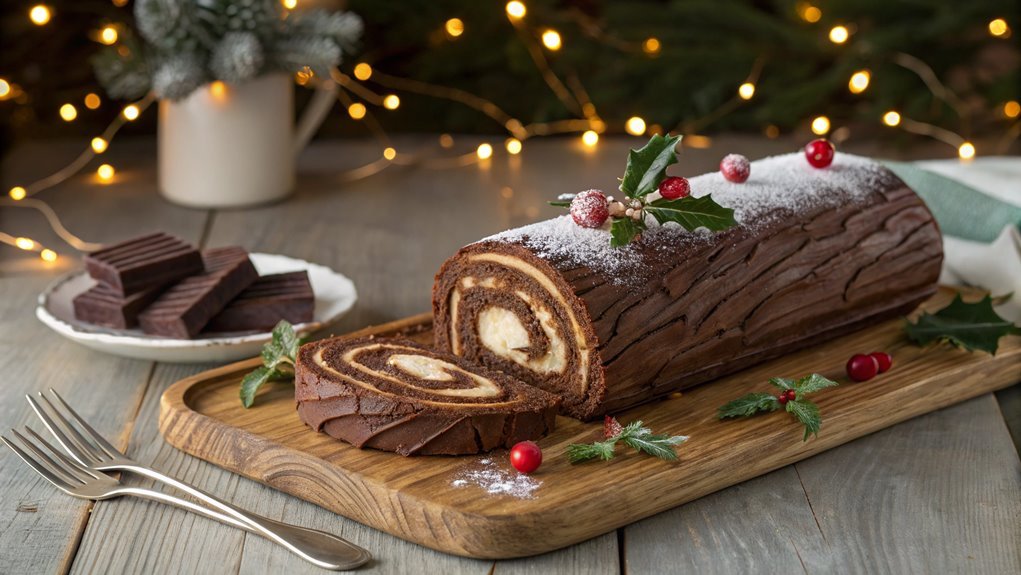
The Yule Log Cake, or Bûche de Noël, is a delightful holiday dessert featuring a light sponge, rich cream filling, and chocolate ganache, offering both a taste and visual treat. Mastering a few key techniques ensures your cake rolls perfectly and looks stunning on the festive table.
Before gathering ingredients, focus on the essential steps that make a significant difference in the cake’s presentation and texture. With proper preparation, this challenging yet rewarding dessert will impress your holiday guests.
Recipe
The Yule Log Cake, also known as Bûche de Noël, is a traditional dessert enjoyed during the Christmas season. This delightful cake is designed to resemble a log, symbolizing the ancient Yule log that was burned to celebrate the winter solstice.
The Yule Log Cake typically features a light and airy sponge cake rolled with rich cream filling, often covered in chocolate ganache to mimic the look of bark. With its festive presentation and delicious flavor, it’s sure to impress your holiday guests.
Making a Yule Log Cake may seem intimidating, but with careful preparation and attention to detail, it can be a fun and rewarding baking experience. Start by preparing the sponge cake, allowing it to cool, then carefully rolling it with your chosen filling.
Once you’ve mastered the rolling technique, the decoration is where the real creativity comes into play. You can use various toppings and techniques to achieve a beautiful and unique finish that captures the spirit of the season.
Ingredients:
- 4 large eggs
- 1 cup granulated sugar
- 1 teaspoon vanilla extract
- 1/2 cup all-purpose flour
- 1/4 cup unsweetened cocoa powder
- 1/2 teaspoon baking powder
- 1/4 teaspoon salt
- 1 cup heavy cream
- 1/2 cup powdered sugar
- 1 teaspoon vanilla extract (for filling)
- 1 cup semi-sweet chocolate chips
- 1/2 cup unsalted butter
- 1 tablespoon water
- Optional: powdered sugar for dusting, edible decorations for garnish
Now let’s move on to the cooking steps.
Cooking Steps
Now that you’ve got your ingredients ready, it’s time to get cooking!
Start by preheating your oven to 350°F, and then whisk those eggs and sugar together until they’re light and fluffy.
With your melted chocolate folded in, you’re just steps away from rolling up your delicious cake and dusting it with powdered sugar for that perfect finish!
Step 1. Preheat Oven to 350°F
To create a perfect Yule log cake, you’ll want to preheat your oven to 350°F. This essential step guarantees that your cake bakes evenly and achieves that delightful, fluffy texture. A properly preheated oven sets the stage for success, so don’t skip this part!
Here’s what you need to do:
- Turn on your oven: Make sure to set it to 350°F before you start mixing your ingredients. This gives the oven a chance to reach the right temperature.
- Use an oven thermometer: If you’re unsure about your oven’s accuracy, an oven thermometer can help confirm it’s truly at 350°F.
- Avoid opening the door: Once it’s preheated, resist the temptation to peek inside. Opening the oven door can cause temperature fluctuations that may affect your cake.
- Prep your baking pan: While the oven is heating, prepare your baking pan by lining it with parchment paper. This will help your cake come out easily and maintain its shape.
With these steps, you’re well on your way to baking a delicious Yule log cake that’ll impress everyone at your holiday gathering! Enjoy the process!
Step 2. Whisk Eggs and Sugar Together
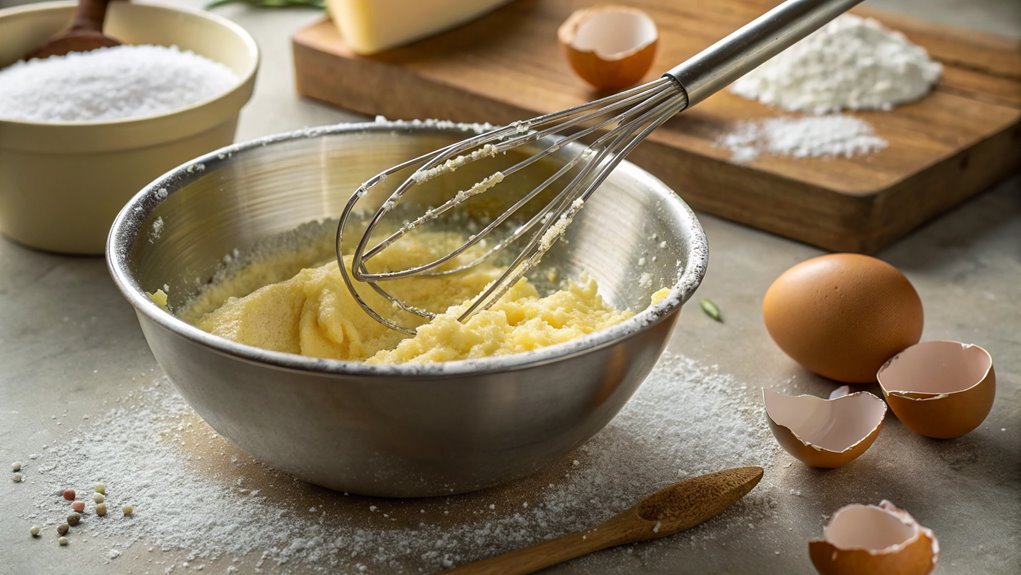
As you gather your ingredients, whisking eggs and sugar together is an essential step that creates the foundation for your Yule log cake’s light and airy texture.
Start by cracking the eggs into a large mixing bowl, ensuring no shells sneak in. You’ll want to whisk these together until they become frothy and pale. This process typically takes about three to five minutes, so don’t rush!
Next, gradually add in the sugar, continuing to whisk. The sugar not only sweetens your batter but also helps to stabilize the eggs, creating that beautiful, fluffy consistency. As you mix, you should notice the mixture becoming thicker and increasing in volume. This is exactly what you want!
If you have an electric mixer, feel free to use it—just be careful not to overmix. You’re aiming for a ribbon-like texture, where the mixture holds its shape for a moment before gently falling back into the bowl.
This delightful combination of eggs and sugar is the heart of your Yule log cake, promising a deliciously moist and airy result.
Enjoy the process, and get ready for the next exciting step!
Step 3. Fold in Melted Chocolate
With your egg and sugar mixture perfectly whipped, it’s time to add a touch of richness by folding in the melted chocolate. This step is essential, so let’s plunge into it with enthusiasm!
First, make sure your chocolate is completely melted and slightly cooled. You don’t want it to be hot, or it might cook the eggs.
Now, gently pour the melted chocolate into your egg mixture. Using a rubber spatula, start folding the chocolate in using a figure-eight motion. This technique helps incorporate the chocolate without deflating the airy mixture you’ve worked hard to create.
Remember, the goal is to achieve a smooth and rich batter that has that delicious chocolate flavor.
Here’s a quick checklist to keep in mind:
- Use high-quality chocolate for the best flavor.
- Be gentle while folding to maintain that fluffy texture.
- Scrape the sides of the bowl to verify everything is well-mixed.
- Don’t rush—take your time to achieve that perfect blend.
Once you’ve folded in the chocolate, you’re one step closer to creating a delightful Yule Log cake that’ll impress everyone at your holiday gathering! Enjoy the process!
Step 4. Roll the Cake Carefully
Rolling the cake carefully is essential for achieving that classic Yule Log shape. Once your cake has cooled slightly, it’s time to get rolling!
Start by placing a clean kitchen towel on your countertop and sprinkle it generously with powdered sugar. This will prevent sticking and make the process smoother.
Next, gently flip the cake onto the prepared towel, ensuring the top side is facing down. This way, when you roll it, the beautiful outer layer will be on the outside.
Now, carefully peel away the parchment paper, taking your time to avoid any tearing.
Begin rolling the cake from one end, using the towel to help guide it. As you roll, keep it tight but not so tight that it squishes the cake. You want a nice, snug roll that holds its shape.
Once fully rolled, wrap the cake in the towel and let it rest for about 30 minutes. This helps the cake maintain its rolled shape and allows it to cool completely.
With this step, you’re on your way to creating a stunning Yule Log that’s sure to impress! Enjoy the process; it’s all part of the fun!
Step 5. Dust With Powdered Sugar
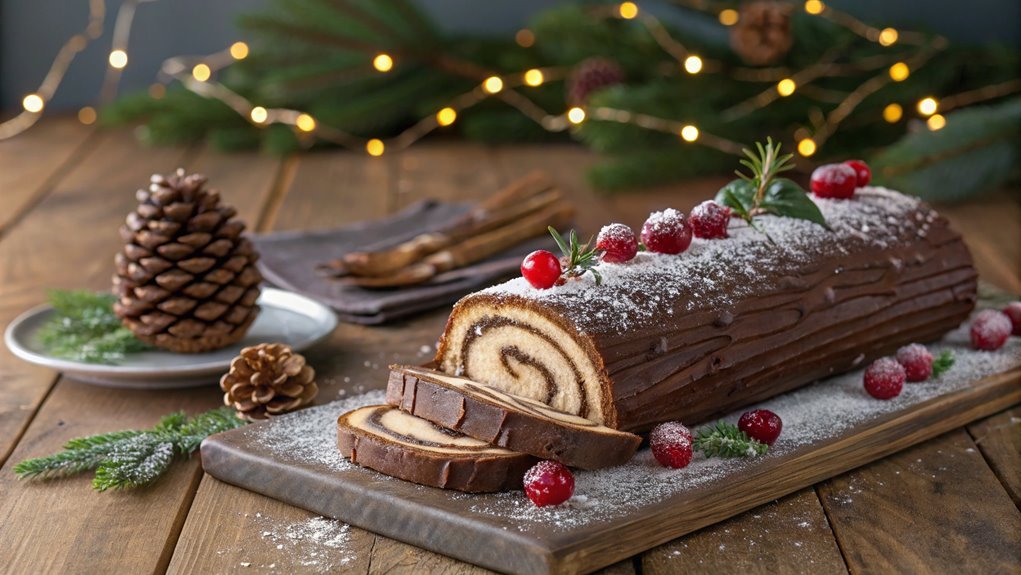
Now that your Yule Log is rolled and ready, it’s time to give it a beautiful finishing touch. Dusting with powdered sugar not only adds a delightful sweetness but also creates a snowy effect, perfect for the festive season. Here’s how to do it:
- Prepare Your Surface: Place your Yule Log on a serving platter or a clean cutting board. This will catch any excess sugar and keep your workspace tidy.
- Use a Sifter: Grab a fine-mesh sieve or sifter. This tool will help you evenly distribute the powdered sugar, creating a lovely, light coating.
- Dust Lightly: Hold the sifter a few inches above the Yule Log and gently tap it, allowing the sugar to fall evenly over the cake. You want a delicate layer, so don’t overdo it!
- Add Final Touches: For an extra festive flair, consider adding decorative elements like fresh berries or mint leaves around the log, enhancing its appeal.
With this final step, your Yule Log will look stunning and ready to impress your guests. Enjoy every slice of this holiday masterpiece!
Final Thoughts
As you prepare to serve your Yule log cake, remember that it’s more than just a dessert; it’s a centerpiece that embodies the warmth and joy of the holiday season.
This delightful creation not only pleases the eye but also tantalizes the taste buds. You’ll find that every slice offers a perfect blend of rich chocolate and creamy filling, making it a treat everyone will adore.
As you gather with family and friends, the Yule log cake sparks conversations and creates lasting memories. Its rustic design brings a touch of tradition to your festive table, reminding everyone of the magic of the holidays.
Don’t be surprised if your guests ask for seconds—or even thirds!
If you’ve followed the recipe closely, you’ve likely crafted a masterpiece that reflects your passion for baking.
Don’t hesitate to add your personal touch, whether it’s extra decorations or a unique flavor twist. The beauty of this cake lies in its versatility.
Frequently Asked Questions
Can I Make a Yule Log Cake Ahead of Time?
Yes, you can definitely make it ahead of time! Just prepare it a day or two in advance, store it properly in the fridge, and let it come to room temperature before serving. Enjoy!
What Is the Best Way to Store Leftovers?
Storing leftovers is like preserving culinary gold! You’ll want to wrap them tightly in plastic wrap or foil, then pop them in an airtight container. Refrigerate for up to a week, and enjoy them later!
Can I Use Gluten-Free Flour for This Recipe?
Yes, you can use gluten-free flour for this recipe. Just make sure to choose a quality blend that mimics the properties of regular flour. Adjust the liquid slightly if needed for the best texture.
What Decorations Can I Use for a Yule Log Cake?
Decorating your cake can be as delightful as painting a masterpiece. You can use powdered sugar for snow, chocolate shavings for bark, or fresh berries for color. Edible glitter adds a magical touch, too!
How Can I Make a Vegan Version of This Cake?
To make a vegan version, substitute eggs with flaxseed meal or applesauce. Use plant-based milk and dairy-free butter. Opt for a vegan chocolate or ganache for frosting, ensuring all ingredients align with your dietary preferences.
Conclusion
Having mastered the Yule Log Cake, you’re set to dazzle your friends and family over the holidays! With about 90 million baked each Christmas, this festive treat adds joy and warmth to celebrations. Gather your ingredients, roll up your sleeves, and craft this delightful centerpiece to make your gatherings special. Enjoy every bite!