Filipino Halo-Halo Recipe

Halo-halo, meaning “mix-mix,” is a popular Filipino dessert showcasing diverse culinary influences. It features layers of sweetened fruits, jellies, and beans, offering a delightful blend of flavors and textures.
The secret to its perfect balance lies in the unique character each ingredient contributes. Consider the steps to create this vibrant treat, ensuring each component complements the others.
Recipe
Halo-Halo is a delightful Filipino dessert that combines a variety of ingredients, making it a colorful and invigorating treat, especially during the hot summer months.
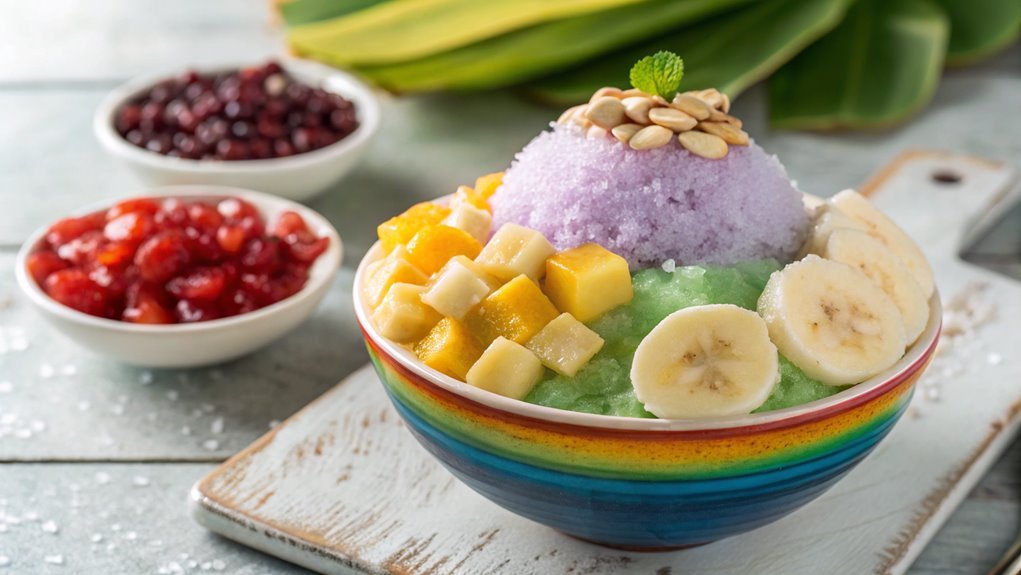
The name “halo-halo” literally means “mix-mix” in Filipino, which perfectly describes how this dessert is prepared. It’s a layered concoction of crushed ice, sweetened fruits, jellies, and beans, topped with leche flan and ube ice cream, all drizzled with evaporated milk.
Each spoonful is a delightful mix of textures and flavors that’s sure to satisfy anyone’s sweet tooth.
To prepare halo-halo, you can customize your ingredients based on your preferences, but the traditional elements are essential for an authentic experience.
This dish isn’t only a feast for the eyes but also a way to celebrate the vibrant culture of the Philippines. Preparing halo-halo is simple and fun, making it a perfect activity for family gatherings or summer parties.
Once you have gathered all your ingredients, the assembly process is easy and allows everyone to add their favorite components.
Ingredients:
- Crushed ice
- Sweetened jackfruit
- Sweetened banana (saba)
- Sweetened red beans
- Sweetened mung beans
- Leche flan (caramel custard)
- Ube (purple yam) ice cream
- Jellies (e.g., green coconut or agar-agar)
- Evaporated milk
- Sugar (optional, to taste)
Now let’s move on to the cooking steps.
Cooking Steps
Get ready to create your own delicious halo-halo!
First, you’ll want to gather all your ingredients so everything’s within reach for easy mixing.
Once you’ve got that sorted, it’s time to layer those vibrant ingredients in a bowl and transform them into a revitalizing treat that’s sure to impress!
Step 1. Prepare Ingredients for Mixing
Before you immerse yourself in mixing your delightful halo-halo, it’s vital to gather all the ingredients you’ll need. Start by collecting a vibrant assortment of fruits, like sweet bananas, juicy jackfruit, and ripe mangoes. You’ll also want to grab some colorful jellies, beans, and perhaps even some sweetened taro. Don’t forget the essential ice and evaporated milk, which will make your halo-halo creamy and invigorating.
Next, prepare your ingredients for mixing. Peel and chop the fruits into bite-sized pieces, making them easy to scoop up later. If you’re using jellies or beans, make sure they’re drained and ready to go.
It’s a good idea to have everything prepped and within reach before you plunge into it. This way, you can enjoy the process without scrambling around looking for what you need.
Gathering your ingredients is part of the fun, so take a moment to appreciate the beautiful colors and textures. You’re creating something special!
Once everything’s ready, you’ll be all set to layer your ingredients and create a mouthwatering halo-halo that’s perfect for any occasion. Get excited—your delicious treat is just a few steps away!
Step 2. Layer Ingredients in a Bowl
Start by layering your ingredients in a bowl, creating a beautiful and colorful masterpiece.
Begin with a generous scoop of sweetened beans at the bottom; their rich texture adds depth to your halo-halo. Next, sprinkle in some jellies for that delightful chewiness. You can use any variety you like—just make sure to mix colors for visual appeal!
Now, it’s time to add some fruits. Chop up ripe bananas, and toss in fresh mangoes or sweet jackfruit. Each fruit brings its unique flavor, making every bite a delightful surprise.
After that, layer in the creamy leche flan; its smoothness contrasts beautifully with the other ingredients.
Don’t forget to include a sprinkle of crushed ice on top of your layers. This will create a revitalizing crunch when you enjoy your halo-halo.
Finally, finish off with a drizzle of evaporated milk for that creamy touch.
As you layer, take a moment to admire the vibrant colors and textures. You’re not just making a dessert; you’re crafting an experience!
Each layer tells a story, and soon, you’ll savor the deliciousness of your creation. Plunge in, and enjoy every spoonful!
Step 3. Add Shaved Ice Generously
With your colorful layers in place, it’s time to add shaved ice generously on top. Imagine the fluffy, icy texture that’s about to elevate your halo-halo to a whole new level! Grab your ice shaver or a sturdy blender, and start creating that light, snowy goodness. You want to pile the shaved ice high, covering those vibrant layers beneath. Don’t be shy—this is the star of the show!
Use a spoon to gently pack the ice down, ensuring it holds its form while still looking inviting. You can create a little mountain of ice, making your halo-halo not only delicious but visually stunning too! The key here is balance; you want enough ice to create that invigorating chill without overwhelming the other flavors.
As you’re adding the ice, take a moment to admire how the colors peek through the fluffy layers. It’s a feast for the eyes! Plus, the texture of the ice will meld beautifully with the sweet ingredients you’ve already layered.
Trust me, this step is essential for that perfect halo-halo experience. Now that you’ve added your shaved ice, you’re one step closer to enjoying this delightful treat!
Step 4. Drizzle With Evaporated Milk
Now that your halo-halo is topped with a delightful mountain of shaved ice, it’s time to add a rich drizzle of evaporated milk. This creamy addition elevates the dessert to a whole new level of indulgence.
Grab a can of evaporated milk, and give it a gentle shake to mix it up. You want that smooth texture to blend beautifully with your other ingredients.
Next, using a spoon or a small pitcher, slowly drizzle the evaporated milk over the shaved ice. Aim for an even coverage, letting it cascade down the sides and soak into the colorful layers beneath. The milk seeps into the ice, creating a luscious creaminess that balances the sweet flavors of the fruits and beans.
Don’t be shy—if you love a rich taste, feel free to add more! The beauty of halo-halo is in its customization, so adjust according to your preference.
Once you’ve added the milk, take a moment to admire your creation. It’s not just dessert; it’s an experience waiting to be enjoyed.
Grab a spoon, dig in, and savor the delightful blend of textures and flavors that make halo-halo so special!
Step 5. Top With Leche Flan
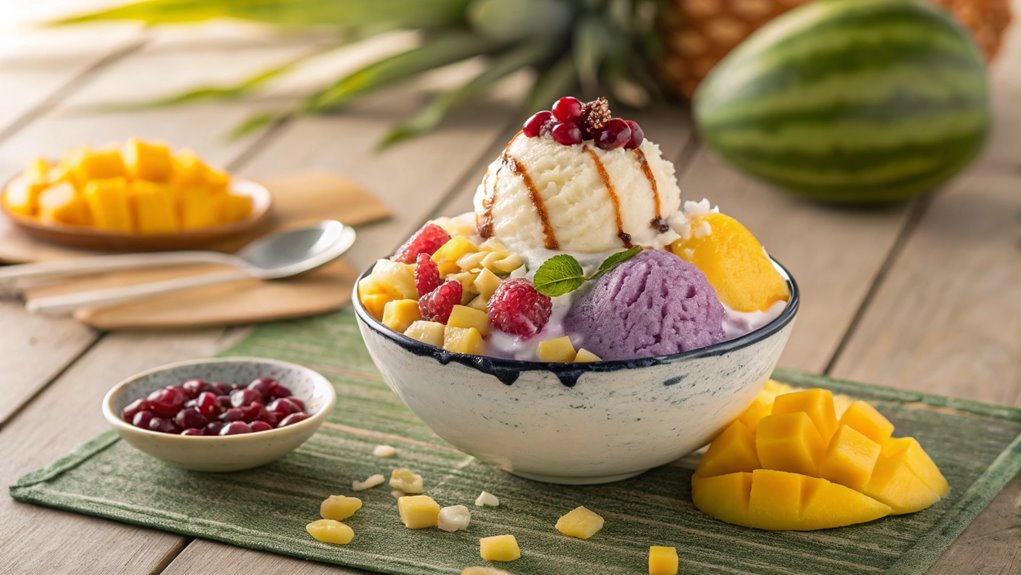
As you layer your halo-halo, adding a slice of leche flan brings a luscious, creamy element that perfectly complements the other ingredients.
The smooth, rich flavor of leche flan enhances the dessert, making each spoonful a delightful experience. To make sure you get the most out of this heavenly topping, follow these steps:
- Slice the leche flan into thick, generous pieces.
- Gently place a slice on top of your halo-halo, allowing it to rest on the colorful layers below.
- Drizzle a little more evaporated milk over the leche flan for added creaminess.
- Add a sprinkle of crushed ice to create a cooling effect that balances the rich flavors.
- Finish with a cherry or a few slices of fresh fruit to add a pop of color and freshness!
Final Thoughts
Though you may have experimented with various desserts, nothing quite compares to the delightful complexity of halo-halo. This vibrant Filipino treat isn’t just a dessert; it’s an experience that brings together a mix of flavors and textures. Each spoonful is like a little adventure, combining sweet beans, creamy leche flan, and invigorating shaved ice.
You get to customize it to your liking, making it uniquely yours!
As you prepare your halo-halo, think about the fun and creativity involved. You can add your favorite fruits, jellies, or even a scoop of ice cream on top.
This flexibility allows you to play with flavors and presentation, making it perfect for gatherings or a cozy day at home.
Frequently Asked Questions
What Ingredients Can I Substitute in Halo-Halo?
If you’re looking to substitute ingredients in halo-halo, try using different fruits like strawberries or peaches, swap the beans for chickpeas, and replace ube with sweet potatoes for a unique twist on this classic dessert.
How Many Servings Does the Halo-Halo Recipe Make?
When you’re tossing a vibrant salad, you want enough for everyone. This halo-halo recipe typically makes about four hearty servings, ensuring you can share the joy and deliciousness with friends and family. Enjoy every scoop!
Can Halo-Halo Be Made in Advance?
Yes, you can make halo-halo in advance. Just prepare the ingredients separately and store them in the fridge. When you’re ready to serve, layer everything together for a revitalizing treat that’s ready to enjoy!
What Are the Variations of Halo-Halo?
When you explore variations of halo-halo, it’s like discovering a treasure chest; each ingredient adds its unique charm. You’ll find flavors like ube, mango, or even beans, each creating delightful surprises in every spoonful.
Is Halo-Halo Suitable for Vegan Diets?
Yes, halo-halo can be suitable for vegan diets if you choose plant-based ingredients. Avoid dairy toppings like ice cream and opt for coconut milk or fruit instead. You’ll enjoy a revitalizing treat that aligns with your dietary needs.
Conclusion
Unleash your creativity with homemade halo-halo! Each layer bursts with flavors, capturing the vibrant spirit of the Philippines in your kitchen.
Every spoonful offers a delightful surprise, making it perfect for any occasion. Gather your ingredients, invite friends, and enjoy this colorful treat that brightens your day!
Happy cooking!