Chocolate Peanut Butter Cups Recipe
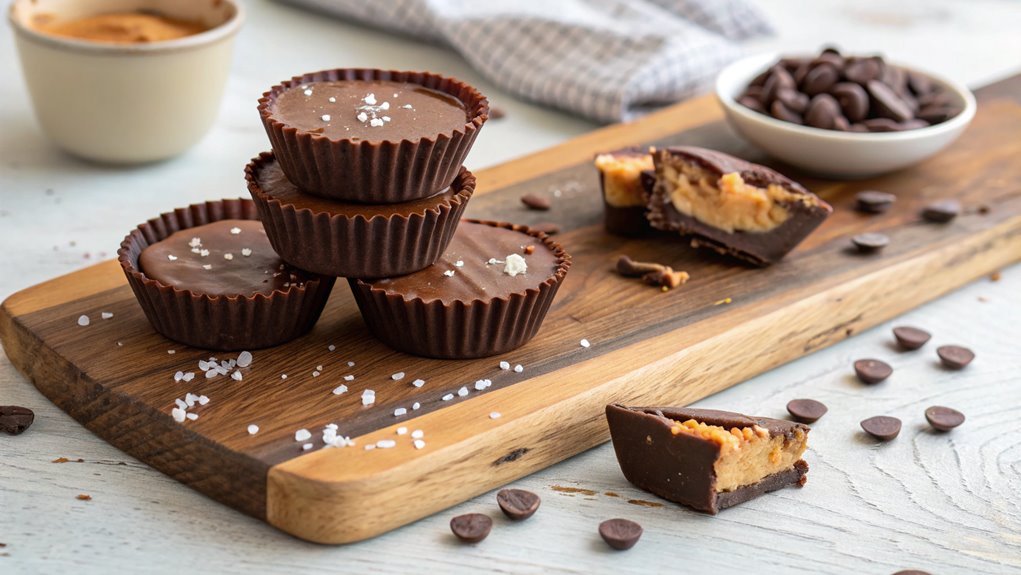
Chocolate Peanut Butter Cups are a delightful way to satisfy sweet cravings. The combination of smooth chocolate and creamy peanut butter elevates these treats. Making them at home allows for customization to your taste. To achieve the perfect balance of flavors, follow the right steps.
Recipe
Chocolate peanut butter cups are a timeless treat that marries the rich, creamy flavor of peanut butter with the indulgent sweetness of chocolate.
This delightful dessert isn’t only a favorite among chocolate lovers but also a nostalgic reminder of childhood bliss. Homemade versions can be customized to your taste, allowing you to control the sweetness and the intensity of the chocolate.
With just a few simple ingredients, you can whip up a batch of these irresistible cups that will surely impress your family and friends.
Making chocolate peanut butter cups at home is an easy and rewarding process. You’ll start by melting the chocolate to create a smooth, decadent base.
Then, you’ll mix together the creamy peanut butter filling that lies in the heart of each cup. By layering the chocolate and peanut butter, you’ll create a perfect balance of flavors and textures.
The best part is that you can keep them in the fridge for a delicious snack whenever the craving strikes!
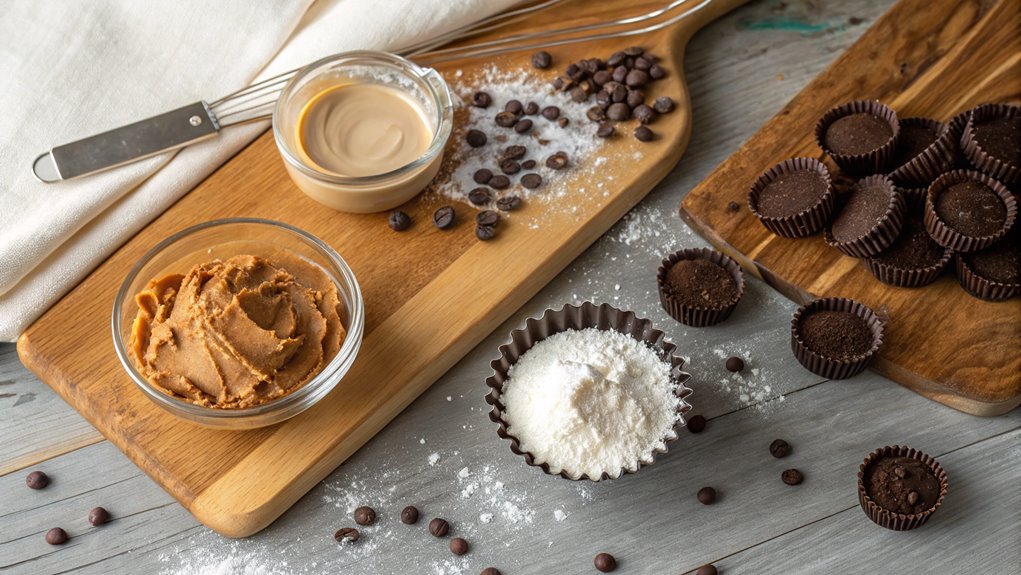
Ingredients:
- 1 cup semi-sweet chocolate chips
- 1/2 cup creamy peanut butter
- 1/4 cup powdered sugar
- 1 teaspoon vanilla extract
- 1 tablespoon coconut oil (optional)
- Sea salt (for sprinkling)
Now let’s move on to the cooking steps.
Cooking Steps
Now, let’s get into the fun part—cooking!
You’ll start by melting the chocolate in a saucepan, creating that smooth, luscious base for your cups.
Once you combine your creamy peanut butter mixture and pour it into molds, the excitement really begins as you watch your delicious creation take shape—don’t forget to chill it until firm!
Step 1. Melt Chocolate in Saucepan
To achieve a smooth and creamy texture in your chocolate peanut butter cups, you’ll want to melt the chocolate carefully in a saucepan. Start by choosing high-quality chocolate chips or bars—this makes a huge difference in flavor!
Place the chocolate in a medium-sized saucepan over low heat. Stir it gently with a spatula as it starts to melt, helping to prevent any burning. Be patient; melting chocolate takes a bit of time, but it’s worth it!
Keep the heat low and continue stirring frequently. You don’t want to rush this process; if the chocolate becomes too hot, it can seize up and lose that luscious texture you’re aiming for.
Once the chocolate is completely melted and silky, remove the saucepan from the heat.
Now’s the exciting part! You can either use the melted chocolate right away for your peanut butter cups or let it cool for a minute or two if it’s too hot to handle.
The aroma of chocolate will fill your kitchen, making it hard to resist. Celebrate this moment—you’re making something delicious! Get ready to move on to the next step and watch your treats come to life!
Step 2. Combine Peanut Butter Mixture
Next, grab a mixing bowl and combine your smooth peanut butter with powdered sugar and a pinch of salt. This is where the magic begins! Using a spatula or a wooden spoon, mix everything together until it’s well-blended and creamy. You want that perfect, thick consistency that will hold its shape but still be super spreadable.
The sweetness of the powdered sugar perfectly balances the richness of the peanut butter, and the salt enhances all those fantastic flavors.
Take a moment to appreciate how wonderful this mixture smells—it’s a delightful combo that makes your mouth water! Once it’s all mixed, you might find yourself wanting to taste just a little bit. Go ahead, it’s hard to resist!
Now that your peanut butter mixture is ready, it’s time to envision how these tasty layers will come together in the end. Remember, the key is to get the right texture so it complements the chocolate beautifully.
This step is essential, and it sets you up for that ultimate chocolate-peanut butter experience. Trust me, you won’t regret the effort. So, onward to the next exciting step!
Step 3. Pour Mixture Into Molds
With your creamy peanut butter mixture ready, it’s time to fill those molds. This is the moment you’ve been waiting for, so let’s make it count! Grab a spoon or a piping bag to make pouring easier. Carefully spoon or pipe the peanut butter mixture into each mold, filling them about halfway. This gives your cups room for that delicious chocolate topping you’ll add later.
Imagine the satisfying sight before you of:
- Smooth, golden peanut butter filling nestled snugly in the molds
- The warm aroma of toasted peanuts wafting through your kitchen
- The anticipation building as you prepare for the next layer
- Delicious, irresistible treats that are sure to impress friends and family
As you fill each mold, take a moment to appreciate how simple yet rewarding this process is. Remember, a little mess is part of the fun, so don’t worry too much about spills.
Once you’ve filled all your molds, set them aside for the next step. You’re one step closer to creating those delightful chocolate peanut butter cups everyone will love! Keep that enthusiasm high; you’re doing great!
Step 4. Chill Until Firm
As your filled molds sit awaiting their next transformation, pop them into the refrigerator to chill until firm. This vital step is where the magic happens! As the chocolate and peanut butter mixture cools, it solidifies beautifully, creating that irresistible texture we all love.
Let them chill for at least an hour, but if you can resist the temptation, letting them set for longer can work wonders. You want your treats to have that perfect bite—smooth and creamy inside, while still holding their shape.
During this time, you can imagine the deliciousness waiting for you. Just picture that rich chocolate coating melting in your mouth, paired with the creamy, nutty peanut butter filling!
Make sure to keep an eye on the time, so your patience pays off. If you check on them every now and then, you’ll feel the excitement build for when they’re finally ready.
Once they’re set, you’ll quickly find out how rewarding your effort was. Grab your molds, pop them out, and prepare for pure delight as you uncover your homemade chocolate peanut butter cups! Trust me, this moment is worth the wait!
Step 5. Add Toppings if Desired

Now that your chocolate peanut butter cups have chilled and set perfectly, it’s time to take them to the next level by adding some delightful toppings. This is where you can really let your creativity shine! Toppings not only enhance the flavor but also elevate the presentation.
So, grab your favorite ingredients and let’s make your treats even more irresistible.
Consider adding one or more of these toppings for an incredible finish:
- Crushed pretzels for a salty crunch that complements the sweetness.
- Drizzled caramel to add an extra layer of rich, buttery flavor.
- Chopped nuts like almonds or peanuts for a satisfying texture.
- Sprinkles for a festive touch that’s perfect for any occasion.
Simply sprinkle or drizzle your chosen toppings over the set chocolate cups. You can use a spoon for drizzling or a zip-top bag with a corner snipped off for precision.
The best part? You can mix and match to create your signature version!
Once you’ve topped them to your heart’s content, let them set for a bit longer. Then, enjoy your delicious, customized chocolate peanut butter cups with friends and family.
Happy indulging!
Final Thoughts
Although you may be tempted to rush through the process, taking your time with this Chocolate Peanut Butter Cups recipe guarantees a delicious outcome. Each step plays an essential role, from melting the chocolate just right to perfectly blending the peanut butter filling.
When you pour the chocolate into the molds, savor the moment; it’s the foundation of your tasty treat. Your patience will pay off when you finally get to enjoy these delightful bites. Just imagine that rich chocolate melting in your mouth, mixed with the creamy, nutty flavor of peanut butter. It’s pure bliss!
Plus, they’re a fantastic gift for friends and family or a sweet way to treat yourself after a long day.
Don’t forget, experimentation can lead to exciting variations. Consider adding sea salt, crushed nuts, or even a hint of vanilla for an extra flavor twist.
Frequently Asked Questions
Can I Use Dark Chocolate Instead of Milk Chocolate?
Sure, you can use dark chocolate instead of milk chocolate! It’s like trading a cozy blanket for a sleek jacket—different vibes, but totally enjoyable. Just know it’ll have a richer, less sweet taste, which some adore!
How Should I Store Leftover Peanut Butter Cups?
To store leftover peanut butter cups, place them in an airtight container and keep them in a cool, dry place. You can also refrigerate them for longer freshness, just let them come to room temperature before enjoying.
Are There Any Nut-Free Alternatives for This Recipe?
If you’re looking for nut-free alternatives, consider using sunflower seed butter or soy nut butter. Both offer a creamy texture and delicious flavor, allowing you to enjoy similar treats without the allergens. It’s that simple!
Can I Make These Chocolate Cups Vegan?
Yes, you can definitely make these chocolate cups vegan! Just swap out dairy chocolate for dairy-free chocolate and use a plant-based butter or coconut oil instead. You’ll create a delicious vegan treat everyone can enjoy!
What Are Some Variations to This Peanut Butter Cup Recipe?
You can experiment with variations by using almond butter, adding crushed nuts, or mixing in coconut flakes. Try different types of chocolate, like dark or dairy-free, to switch up the flavor and texture. Enjoy the creativity!