Hot Chocolate Bomb Recipe

Enhance your hot chocolate experience by crafting hot chocolate bombs that add elegance and interactivity to your beverage. These treats involve melting chocolate and sealing molds, with precise techniques making all the difference.
Mastering the process requires attention to detail, ensuring a perfect melt into warm milk. With a few simple steps, you can create delightful bombs that elevate a classic drink.
Recipe
Hot chocolate bombs are a delightful treat that brings warmth and joy, especially during chilly months.
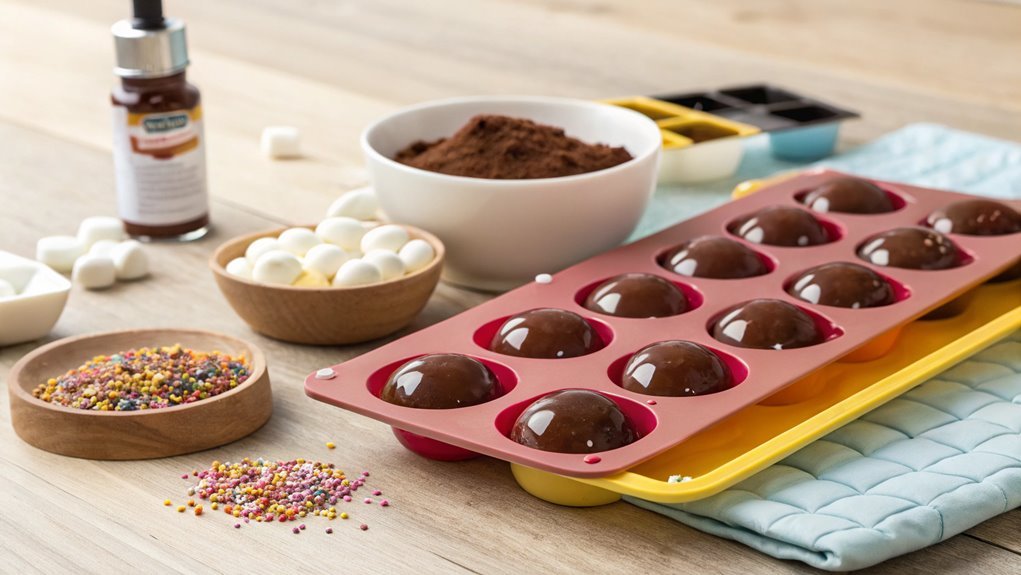
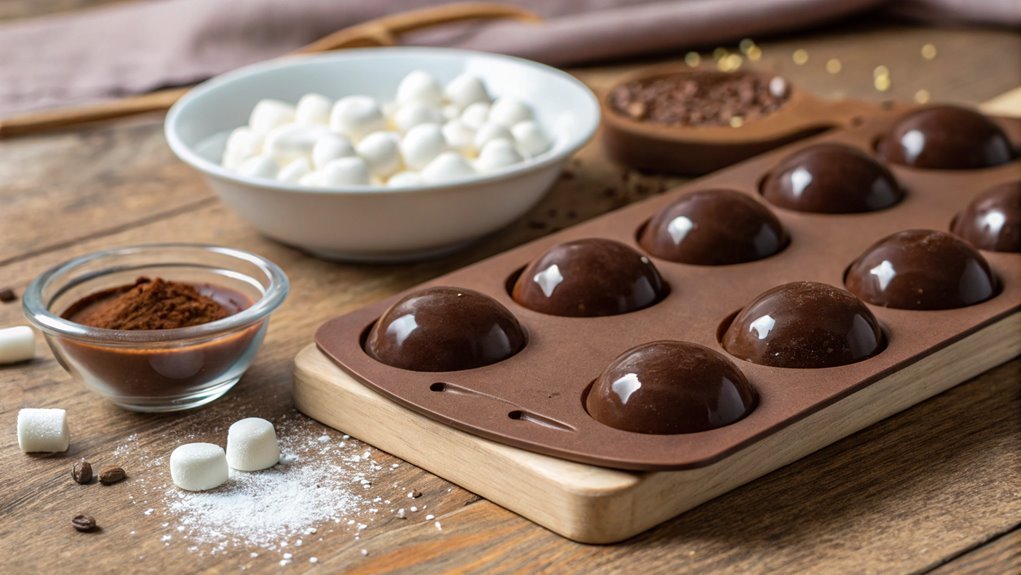
These charming, chocolate-coated spheres are filled with hot cocoa mix and marshmallows, and they melt into a luscious cup of hot chocolate when submerged in warm milk. Making hot chocolate bombs isn’t only a fun and creative activity, but it also allows you to customize your ingredients, adding your favorite flavors or toppings.
To create these delicious confections, you’ll need a silicone mold to shape the chocolate. The beauty of hot chocolate bombs lies in their versatility, allowing you to experiment with different types of chocolate, fillings, and even decorative toppings.
Once you’ve mastered the basic technique, you can get creative with your designs, making them perfect for gifts or special occasions. Let’s explore the ingredients you’ll need to create your very own hot chocolate bombs.
Ingredients:
- 1 cup of semi-sweet or milk chocolate chips
- 1 cup of hot cocoa mix
- 1 cup of mini marshmallows
- 1 teaspoon of vanilla extract (optional)
- Food coloring (optional, for decoration)
- Sprinkles or edible glitter (optional, for decoration)
- Silicone mold for shaping the bombs
Now let’s move on to the cooking steps.
Cooking Steps
Now that you’ve gathered your ingredients, it’s time to get cooking!
You’ll start by melting the chocolate in the microwave, then fill your molds with this delicious mixture.
Once the molds are sealed and chilled, you can add marshmallows and cocoa to create a delightful treat that’s sure to warm your heart.
Step 1. Melt Chocolate in Microwave
To melt chocolate in the microwave, start by breaking it into small, even pieces for consistent melting. This step is essential because uneven chunks can lead to some bits burning while others remain solid.
Next, place the chocolate in a microwave-safe bowl. Remember, you want to use a bowl that can withstand heat, like glass or ceramic.
Now, set your microwave to medium power. Heat the chocolate in short bursts of about 20-30 seconds. After each burst, take the bowl out and stir the chocolate. This helps distribute the heat evenly and prevents burning.
You’ll notice the chocolate slowly transforming into a smooth, luscious mixture. Keep going until it’s fully melted but be careful not to overheat it.
If your chocolate isn’t melting as quickly as you’d like, that’s okay! Just be patient and keep stirring.
Once it’s completely melted, you’ll have a delightful, glossy chocolate ready for your hot chocolate bombs. This process is simple but so satisfying.
You’re one step closer to creating a cozy treat that everyone will love. Enjoy the experience, and get ready to impress your friends and family with your delicious creation!
Step 2. Fill Molds With Mixture
Once you’ve melted the chocolate, it’s time to fill the molds with your delicious mixture. Grab your chocolate molds and a spoon or a piping bag for easy handling.
Carefully spoon or pipe a layer of melted chocolate into each mold, making certain to cover the bottom and sides evenly. You want a nice, thick shell, so don’t hold back—about a quarter inch should do the trick.
Once you’ve filled the molds, gently tap them on the countertop. This helps eliminate any air bubbles and guarantees a smooth surface.
After that, let the chocolate set for a few minutes at room temperature until it starts to harden. If you want to speed up the process, you can pop them in the fridge for about 10 minutes.
While the chocolate is setting, you can prepare your filling. Think mini marshmallows, hot cocoa mix, or even crushed candy canes for a festive twist!
Once the chocolate is firm enough, it’s ready for the next step. Filling your molds is the exciting part, so have fun with different combinations and flavors. Your hot chocolate bombs are already looking amazing!
Step 3. Seal the Chocolate Molds
After your chocolate shells have set, it’s time to seal the molds and create those delightful hot chocolate bombs.
Start by gently heating a small plate in the microwave for about 30 seconds. This will be your secret weapon to melt the edges of your chocolate shells.
Carefully remove the chocolate halves from the molds, making certain they’re intact and ready to be joined.
Take one half of the chocolate shell and place it face down on the warm plate for just a few seconds. You’ll notice the edges start to slightly melt, which is exactly what you want!
Now, grab the other half and press it gently onto the melted edge of the first half. Hold them together for a few seconds to let the chocolate bond. This step is essential, as it guarantees your hot chocolate bomb stays intact when it’s time to enjoy it.
Repeat this process for all your chocolate halves.
Once you’ve sealed them all, you’ll have beautiful, shiny bombs ready to bring joy to your hot cocoa experience. The excitement of watching them melt in warm milk is simply irresistible!
Enjoy the satisfaction of your creation!
Step 4. Chill Molds for 30 Minutes
While your chocolate shells are sealing, it’s vital to chill the molds for 30 minutes. This step might seem simple, but it’s essential for achieving that perfect chocolate bomb shape and ensuring the shells are sturdy enough to hold their delicious contents.
Start by placing your filled molds in the refrigerator, giving the chocolate a chance to firm up. The cool temperature helps the chocolate set properly, creating a beautifully smooth finish. You’ll want to keep an eye on the clock, as waiting those 30 minutes will pay off in the end.
During this time, you can take a moment to clean up your workspace or start dreaming about the flavors you’ll be adding later. The anticipation will only make the process more exciting!
Once the time’s up, you can gently remove the molds from the fridge. Carefully pop out the chocolate shells, and admire your hard work. If they come out easily, you know you’ve done everything right. If not, don’t worry—just give them a little more time in the fridge.
Now, you’re one step closer to creating a delightful hot chocolate experience that everyone will love!
Step 5. Add Marshmallows and Cocoa
With your chocolate shells ready, it’s time to add the fun ingredients that will make your hot chocolate bomb truly special.
Start by carefully removing the shells from the molds. Place one half on a plate with the open side facing up.
Now, grab your cocoa powder and sprinkle about one to two tablespoons into the shell. This rich cocoa will create that delicious, chocolatey flavor you crave.
Next, it’s time for the marshmallows! Add a handful of mini marshmallows into the shell on top of the cocoa. These little puffs of sweetness will melt perfectly when you pour hot milk over your bomb.
If you’re feeling adventurous, you can also toss in a few chocolate chips for an extra indulgent treat!
Once you’ve filled one half of the shell, take the other half and gently press it on top to seal the bomb. Make sure it’s snug for the ultimate hot chocolate experience.
Now, you’ve created a delightful masterpiece that’s just waiting to burst with flavor.
Repeat this process for any additional bombs you want to make, and get ready for the cozy joy of hot chocolate!
Final Thoughts
As you savor your homemade hot chocolate bombs, it’s clear that this delightful treat not only warms the soul but also brings a touch of fun to your cocoa experience.
Watching the chocolate melt and blend with steaming milk is a moment of pure joy, one that you’ll want to share with family and friends.
Whether you’re making them for a cozy night in or a festive gathering, these bombs are sure to impress.
Here are a few reasons to plunge into this delicious adventure:
- Creative Freedom: Experiment with flavors and fillings to make each bomb uniquely yours.
- Perfect for Gifting: Package them up and share the warmth with loved ones.
- Kid-Friendly Fun: Get the little ones involved in the decorating process.
- Easy to Customize: Adjust the sweetness or add spices to suit your taste.
- Impressive Presentation: Their beauty adds a special touch to any occasion.
Frequently Asked Questions
Can I Use Dairy-Free Chocolate for Hot Chocolate Bombs?
Absolutely, you can use dairy-free chocolate! It melts just as well, and you’ll still enjoy a delicious treat. Just make certain to check the ingredients to guarantee they’re suitable for your dietary preferences. Enjoy!
How Long Do Hot Chocolate Bombs Last When Stored?
If you’re storing treasures from the pantry, your creations can last up to six months in a cool, dry place. Just make sure they’re sealed tight, and they’ll stay delicious for you to enjoy!
Can I Add Flavors to the Hot Chocolate Mix?
Absolutely, you can add flavors to your hot chocolate mix! Try vanilla extract, peppermint, or even spices like cinnamon. Experiment with different combinations to find your perfect blend that suits your taste preferences. Enjoy!
What Molds Are Best for Making Hot Chocolate Bombs?
When choosing molds, consider silicone for flexibility, stainless steel for durability, or plastic for affordability. Each type offers unique advantages, so pick what suits your needs best, and you’ll create delightful treats effortlessly.
Can I Make Hot Chocolate Bombs in Advance for Gifts?
Absolutely, you can make those delicious treats in advance! Just store them in an airtight container, away from heat and moisture. They’ll stay fresh for weeks, making them perfect gifts for friends and family.
Conclusion
Crafting hot chocolate bombs is a delightful experience that warms both heart and home. These treats are ideal for cozy nights or thoughtful gifts, letting you share the magic with loved ones. Gather your ingredients and dive into this delicious adventure—nothing compares to the simple pleasure of homemade hot cocoa!